Exposing Azure Storage on Domain Apex With Let's Encrypt SSL
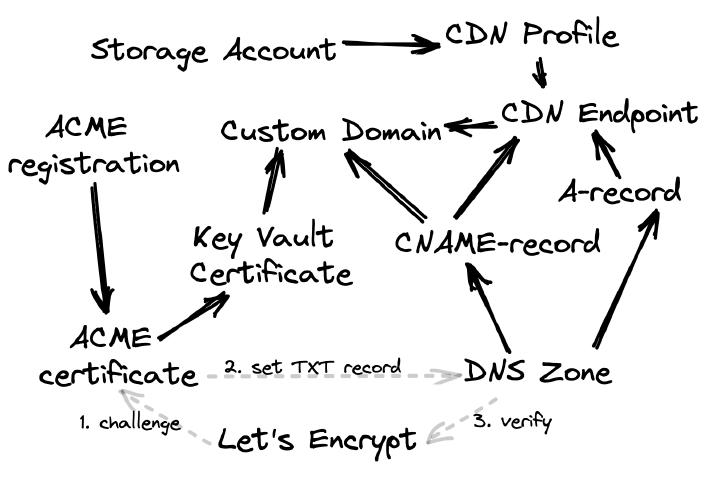
Hello, reader; in this article, I will explain how to expose an Azure Storage Account through a top-level domain with the Let’s Encrypt SSL certificate you can get for free, almost all via Terraform .
First, you must start by creating an Azure Resource Group. Let’s name it something like a blog. Every group mandates a name and location. I’d also urge adding a fair portion of tags.
resource "random_string" "naming" {
  special = false
  upper   = false
  length  = 6
}

resource "azurerm_resource_group" "this" {
  name     = "blog"
  location = "westeurope"
  tags = {
    root  = "false"
    epoch = random_string.naming.id
  }
}
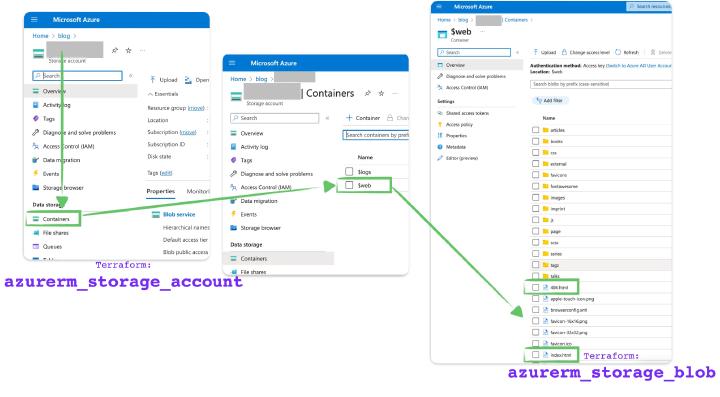
In that resource group, you have to create an Azure Storage Account. We need a locally redundant storage replication type for this article. To turn the Storage Account into a static website, we have to specify index and error 404 documents.
resource "azurerm_storage_account" "this" {
  name = "blog${random_string.naming.id}"
  resource_group_name = azurerm_resource_group.this.name
  location = azurerm_resource_group.this.location
  tags = azurerm_resource_group.this.tags
  account_kind = "StorageV2"
  account_tier = "Standard"
  account_replication_type = "LRS"

  static_website {
    index_document = "index.html"
    error_404_document = "404.html"
  }
}
Now create a storage blob with the name and type and content type and some sources. This article will create an index.html blob with the text “it works.”
resource "azurerm_storage_blob" "dummy" {
  name                   = "index.html"
  storage_account_name   = azurerm_storage_account.this.name
  storage_container_name = "$web"
  type                   = "Block"
  content_type           = "text/html"
  source_content         = "It works!"
}
Content Distribution Network (CDN)
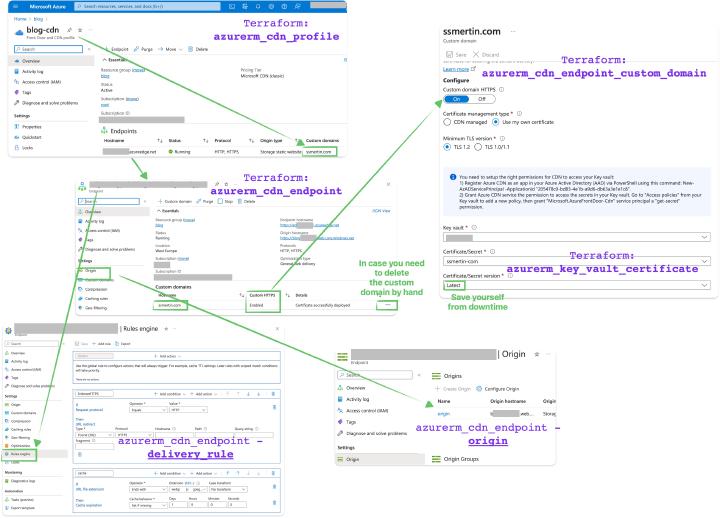
Exposing a Storage Account to the internet under a proper name with the certificate is essential. Initiating a CDN profile within your resource group is the simplest SKU. We’ll use Standard Microsoft SKU because it’s the simplest. You can also use other CDNs from Azure, but they are outside this article.
resource "azurerm_cdn_profile" "this" {
  name = "${azurerm_resource_group.this.name}-cdn"
  resource_group_name = azurerm_resource_group.this.name
  location = azurerm_resource_group.this.location
  tags = azurerm_resource_group.this.tags
  sku = "Standard_Microsoft"
}
Once we have the CDN profile, we must get the CDN endpoints within the it. Origin host header from the primary web host of your Storage Account. You also have the specify the hostname in The Origin block. It is the routing and caching proxy for your Storage Account where you define the delivery rules on how your URLs are getting rewritten. The only defined rule would enforce HTTPS and only HTTPS protocol for your website. Please consult the documentation for more detail on the matter.
resource "azurerm_cdn_endpoint" "this" {
  name = "edge-${random_string.naming.id}"
  profile_name = azurerm_cdn_profile.this.name
  location = azurerm_resource_group.this.location
  resource_group_name = azurerm_resource_group.this.name
  origin_host_header = azurerm_storage_account.this.primary_web_host

  origin {
    name = "origin"
    host_name = azurerm_storage_account.this.primary_web_host
  }

  delivery_rule {
    name  = "EnforceHTTPS"
    order = 1

    request_scheme_condition {
      operator = "Equal"
      match_values = ["HTTP"]
    }

    url_redirect_action {
      redirect_type = "Found"
      protocol = "Https"
    }
  }
}
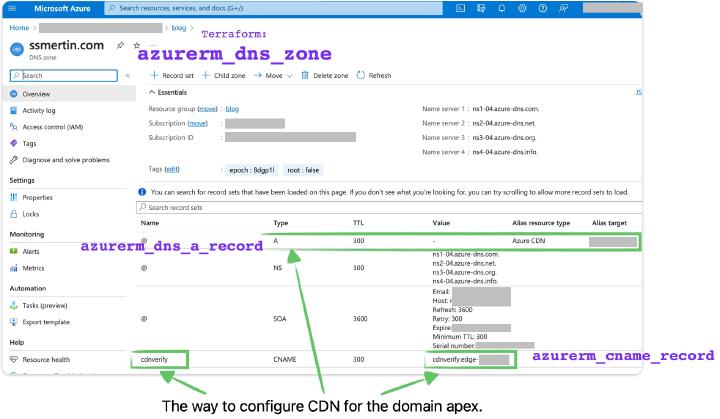
Now you’ll have to define the DNS zone with the domain name your website will be visible. I’ve used Google domains as a domain purchasing service for this article because you could not buy a domain via Azure. Or at least I could not find that in the Azure portal. We need to get the list from it and go to the Google Domains console to update nameservers for a few minutes.
resource "azurerm_dns_zone" "this" {
  name = var.domain_name
  resource_group_name = azurerm_resource_group.this.name
  tags = azurerm_resource_group.this.tags
}
Pointing Domain Apex to Azure CDN
When you have a top-level domain name, like ssmertin.com, you cannot create a CNAME record for it in DNS. The A-record is the only way to assign a human-readable hostname for your CDN Endpoint. You point a record in your DNS zone through the target resource ID to the identifier of your created CDN Endpoint. You have to use @ as the name. But more than just targeting resource ID through A-record is needed for Azure CDN to be bound with your CDN profile.
resource "azurerm_dns_a_record" "cdn" {
  name                = "@"
  zone_name           = azurerm_dns_zone.this.name
  resource_group_name = azurerm_resource_group.this.name
  target_resource_id  = azurerm_cdn_endpoint.this.id
  ttl                 = 300
}
You have to create a CNAME record with the particular cdnverify name as the subdomain for your CDN Endpoint so that Azure CDN comprehends this domain.
resource "azurerm_dns_cname_record" "cdnverify" {
  name                = "cdnverify"
  zone_name           = azurerm_dns_zone.this.name
  resource_group_name = azurerm_resource_group.this.name
  record              = "cdnverify.${azurerm_cdn_endpoint.this.fqdn}"
  ttl                 = 300
}
To connect Azure CDN to the domain, you had to create a custom domain for Azure CDN Endpoint, which depends on CNAME record for cdnverify alias. For this article, we’re going to settle on user-managed HTTPS. We want a certificate from Let’s Encrypt
and use it elsewhere besides the website. And to do the user-managed HTTPS, you must have an Azure Key Vault secret. And I strongly recommend using the version-less secret ID so that you care less about downtimes during certificate renewals.
resource "azurerm_cdn_endpoint_custom_domain" "this" {
  name            = replace(azurerm_dns_zone.this.name, ".", "-")
  cdn_endpoint_id = azurerm_cdn_endpoint.this.id
  host_name       = azurerm_dns_zone.this.name

  user_managed_https {
    key_vault_secret_id = azurerm_key_vault_certificate.this.versionless_secret_id
  }

  depends_on = [
    azurerm_dns_cname_record.cdnverify
  ]
}
Exposing Certificates to CDN
Let’s go ahead and create Azure Key Vault. You need a resource group and Tenant ID to create an Azure Key Vault via Terraform . Add network access control lists to allow all traffic from Azure services and deny any traffic other than our IP address. Also, define two access policies. The first one will be for your user, that could do almost anything suitable with keys, secrets, and certificates. The other policy is for the CDN application, which needs to read secrets and certificates from this particular Key Vault.
data "azurerm_client_config" "current" {}

data "http" "ip" {
  url = "https://ifconfig.me/ip"
}

resource "azurerm_key_vault" "this" {
  name                       = "kv-${random_string.naming.id}"
  location                   = azurerm_resource_group.this.location
  resource_group_name        = azurerm_resource_group.this.name
  tenant_id                  = data.azurerm_client_config.current.tenant_id
  sku_name                   = "standard"
  soft_delete_retention_days = 7

  network_acls {
    bypass         = "AzureServices"
    default_action = "Deny"
    ip_rules       = [data.http.ip.response_body]
  }

  access_policy {
    tenant_id = data.azurerm_client_config.current.tenant_id
    object_id = data.azurerm_client_config.current.object_id
    key_permissions = ["Create", "Delete", "Get", "Import",
    "List", "Sign", "Update", "Verify", "Rotate"]
    secret_permissions  = ["Delete", "Get", "List", "Set"]
    storage_permissions = ["Delete", "Get", "List", "Set", "Update"]
    certificate_permissions = ["Create", "Delete", "Get", "Import",
    "List", "Update", "Purge", "Recover"]
  }

  access_policy {
    tenant_id               = data.azurerm_client_config.current.tenant_id
    object_id               = azuread_service_principal.azure_cdn.object_id
    certificate_permissions = ["Get"]
    secret_permissions      = ["Get"]
  }
}
You need to register the Azure CDN Application in your Active Directory. It doesn’t work out of the box for something that is platform-native. You can do it through the service principal resource from the azuread terraform provider. You can get the application ID from another website if you don’t trust this article.
resource "azuread_service_principal" "azure_cdn" {
  application_id = "205478c0-bd83-4e1b-a9d6-db63a3e1e1c8"
}
Speaking of service principals. We need to have another one for a user that would be able to set the TXT record in our DNS zone. We want to keep permissions for this service principal as tight as possible. Therefore we create a custom IAM Role Definition for it and assign this role definition in the scope of Azure DNS for this particular service principal. Remember that your azuread_custom_directory_role is different from what you need. Per your IAM role definition, you need assignable scopes to the entire resource group.
resource "azurerm_role_definition" "letsencrypt" {
  name        = "Letsencrypt Contributor"
  description = "This custom role allows managing DNS TXT records"
  scope       = azurerm_resource_group.this.id

  permissions {
    actions = [
      "Microsoft.Network/dnsZones/TXT/*",
      "Microsoft.Network/dnsZones/read",
      "Microsoft.Authorization/*/read",
      "Microsoft.ResourceHealth/availabilityStatuses/read",
      "Microsoft.Resources/deployments/read",
      "Microsoft.Resources/subscriptions/resourceGroups/read"
    ]
    not_actions = []
  }

  assignable_scopes = [
    azurerm_resource_group.this.id
  ]
}

resource "azurerm_role_assignment" "update_txt_record" {
  scope              = azurerm_dns_zone.this.id
  role_definition_id = azurerm_role_definition.letsencrypt.role_definition_resource_id
  principal_id       = azuread_service_principal.letsencrypt.object_id
}
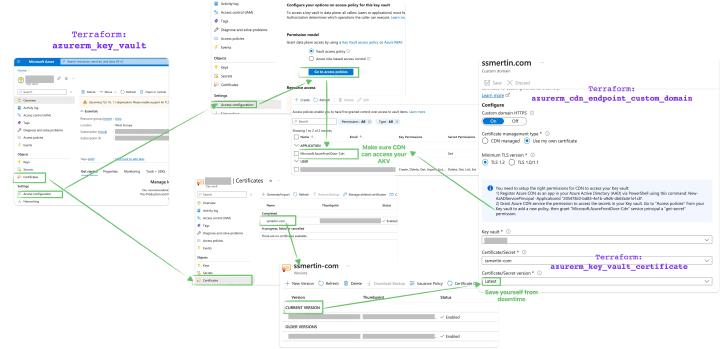
Obviously exposed in Azure portal app registration at least in 2023, so before creating a service principal, you have to make an Active Directory application with the name of your choice.
resource "azuread_application" "letsencrypt" {
  display_name = "letsencrypt"
}

resource "azuread_service_principal" "letsencrypt" {
  application_id = azuread_application.letsencrypt.application_id
}

resource "time_rotating" "monthly" {
  rotation_days = 30
}

resource "azuread_service_principal_password" "letsencrypt" {
  service_principal_id = azuread_service_principal.letsencrypt.object_id
  rotate_when_changed = {
    rotation = time_rotating.monthly.id
  }
}
acme Terraform Provider
For this article, we use Terraform as much as possible. Using the ACME provider to use Let’s Encrypt central authority would be the best.
terraform {
  required_providers {
    acme = {
      source  = "vancluever/acme"
      version = "~> 2.0"
    }
  }
}

provider "acme" {
  // don't use staging endpoint, as it obviously won't work with AKV
  server_url = "https://acme-v02.api.letsencrypt.org/directory"
}
Before you can do anything with Let’s Encrypt central authority, you have to register. To register, you must create your private key using the TLS Terraform provider. Keep in mind that the private key is going to be stored in your Terraform state. Secure access to the Terraform state and do not commit it to any readily accessible place other than your inner circle of trust. You can get yourself into trouble.
resource "tls_private_key" "private_key" {
  algorithm = "RSA"
}

resource "acme_registration" "me" {
  account_key_pem = tls_private_key.private_key.private_key_pem
  email_address   = var.email_for_renewal_alerts
}
Once you have your Let’s Encrypt
central authority registration of your email address with the private key, you can request SSL certificates through ACME protocol. We will use the DNS challenge protocol
and the service principal we’ve just created and supplied environment variables through the config attribute. You may ask: why do I need to create a service principal? Could it authorize through the credentials that I’m already using to modify this DNS zone? Unfortunately, the ACME provider does not pick up the same environment variables as your azurerm: AZURE_CLIENT_ID versus ARM_CLIENT_ID. Therefore you have to be very creative and very explicit with the security credentials that you are using. The ACME provider uses the LEGO library
to work with ACME protocol to retrieve certificates from Let’s Encrypt
.
resource "acme_certificate" "certificate" {
  account_key_pem = acme_registration.me.account_key_pem
  common_name     = azurerm_dns_zone.this.name

  depends_on = [
    azurerm_role_assignment.update_txt_record
  ]

  dns_challenge {
    provider = "azure"
    config = {
      AZURE_TENANT_ID       = data.azurerm_client_config.current.tenant_id
      AZURE_CLIENT_ID       = azuread_application.letsencrypt.application_id
      AZURE_CLIENT_SECRET   = azuread_service_principal_password.letsencrypt.value
      AZURE_SUBSCRIPTION_ID = data.azurerm_client_config.current.subscription_id
      AZURE_RESOURCE_GROUP  = azurerm_resource_group.this.name
    }
  }
}
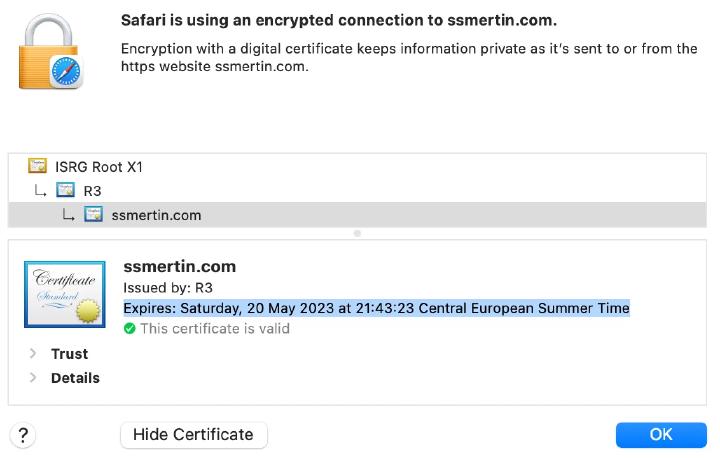
Getting the certificate from Let’s Encrypt central authority may take a minute, but you need to store it somewhere after. The Key Vault is required. Because how else will CDN know about your latest-greatest Let’s Encrypt certificates?
resource "azurerm_key_vault_certificate" "this" {
  name         = replace(azurerm_dns_zone.this.name, ".", "-")
  key_vault_id = azurerm_key_vault.this.id

  certificate {
    contents = acme_certificate.certificate.certificate_p12
  }
}
Also, you can schedule Terraform daily/weekly/monthly to refresh Let’s Encrypt certificates for you automatically. You should create a dedicated Azure service principal for that. What permissions would you need? First of all, the service principal would have to be able to read all resources in this particular resource group. Otherwise, reading from terraform state file fails. Then the service principal should be able to modify SSL certificates in your Key Vault, and you should be able to change TXT records in your DNS zone.
Remember that Terraform state contains sensitive information like your private TLS certificate that you use to request new certificates from Let’s Encrypt , the Let’s Encrypt certificate itself, and the password for the Active Directory service principal that you’ve created to modify records on the DNS zone.